Showing posts with label Recipes & Cooking. Show all posts

Tuesday, November 24, 2020

Pink Perch or Rani fish fry - healthy and yummy

This Diwali, we went to our friend’s house to celebrate a green Diwali, no crackers or fireworks, only lights, diyas, good food, and lots and lots of adda… simple fun, food, and masti 😊

Dinner was simple rice and mutton gravy.... we had lots of starters, roasted peanut masala and grilled charcoal chicken. Of course, the kids had ice cream too 😊

Next day, lunch was even simpler, rice, dal, chicken liver curry, and Pink perch or Rani fish fry. It was really yumm…this was the first time we ate pink perch, and instantly fell in love with it. I had seen this fish a lot of time in fish shop, but I was not sure about the taste, so never tried it. Thanks to Remya for introducing us to this fish and thanks to her wonderful cooking.

Pink Perch or Rani is a common freshwater fish in India. It is high in protein and low on mercury, moderate in terms of Omega 3 supply. You can definitely have Rani fish at least twice to thrice a week. If you are on a weight loss journey this can be a good companion as it is a very lean fish with less fat.

Ingredients:

  • 6 medium-sized pink perch or rani fish, cleaned and sliced on both sides
  • Oil as needed to fry, you can shallow fry in non-stick pan (I air fried, so I needed only 2 tbsp oil just to brush them on both sides)

For marination

  • 2 tbsp onion paste
  • 2 tbsp ginger, garlic, and green chili paste
  • 2 tbsp turmeric powder
  • 1 tbsp red chili powder
  • 1 tbsp lemon juice
  • Black pepper powder 1 tbsp
  • Salt as per taste

Method

  • Marinade the fishes with all the ingredients and keep aside for minimum of 1 hour, I left them overnight in fridge
  • Next day, before lunch I air-fried them. You can shallow fry them in a non-stick pan or deep fry them in a heavy bottom pan, just be little careful while flipping the fishes as the skin is very soft it sticks to the pan very easily
  • Fry both sides till golden brown

Take them out in serving plate and sprinkle some lemon juice and serve hot with warm rice…


Follow my blog with Bloglovin

Sunday, November 22, 2020

Dalia khichdi - delicious one-pot meal and ultimate comfort food

Daliya or broken wheat is considered to be a good choice as a good choice for reducing refined grains. We can make khichdi, upma, pongal with Daliya and all of them tastes equally delicious. Daliya is mostly consumed during winter or monsoon as wheat helps to keep the body warm; however, for my family this is anytime favorite breakfast.
Health benefits of Daliya:
  • Rich in dietary fiber, aids in managing diabetes and constipation
  • Iron helps in overcoming fatigue and anemia
  • Magnesium helps maintaining normal heartbeat
  • Potassium is beneficial for controlling hypertension
  • Low fat and high fiber content assists in healthy weight management
  • Minerals helps building strong bones
  • Protein helps growing kids and gives strength to the body
  • Vitamins supports energy metabolism
Daliya khichdi is a delicious one pot meal made from broken wheat, moong dal and lots of veggies. It’s incredible light and healthy and is one of the simplest recipes to make, consistency of this khichdi is so soft that it is easy for kids to swallow and is also a perfect comfort food, more so during winters.

Ingredients
  • 1 cup daliya
  • ½ cup moong dal
  • 1 cup of cubed veggies of your choice (potato, carrot, beans, cauliflower, peas)
  • 1 sliced green chilli
  • 1 tbsp cumin seeds
  • Whole garam masala (2 cloves, 2 green cardamoms, 1 cinnamon stick)
  • 1 tsp turmeric powder
  • 1 tsp cumin powder
  • 1 tsp ginger paste
  • ½ tsp garam masala powder
  • ½ tsp red chilli powder (optional)
  • Salt as per taste
  • 2 tbsp ghee (I used my homemade ghee)
  • 2 tbsp of freshly chopped coriander leaves
Method
  • Heat a heavy bottom pan or pressure cooker and put 1 tbsp ghee in it
  • Add the whole garam masala, cumin seeds, and sliced green chili in it
  • Once the cumin seeds splutters add all the veggies and sautΓ© a little bit
  • Add the ginger paste, turmeric powder, cumin powder, and red chili powder in it
  • Fry them for a while
  • Add washed daliya and moong dal and mix well
  • Add salt and then add 5 cups of water
  • Cook for 2 whistles and let the steam release on its own
Once the pressure is down, open and serve hot with 1 tbsp of homemade gee and garnish with freshly chopped coriander leaves

Follow my blog with Bloglovin

Banana fritters – tasty chai time snacks on a lazy weekend evening

It was Diwali season, visiting friends and family, lots of celebration and festive eating; naturally, healthy eating took a backseat, especially the fruits. The fruit basket on my dining table kept waiting for visitors, but only got some fruit flies 😊. Finally, I could not let them suffer anymore, the poor bananas were turning black and were almost about to be thrown away.

So, I thought of making something with overripe bananas…why not some banana fritters, a special Bengali delicacy; we were still in festive mood, a little fried food would not harm much 😊.

So here are the banana fritters to go with evening tea or coffee, crispy from outside and soft from inside.


Ingredients

  • 2 overripe bananas
  • 1 cup rice flour
  • 2 tbsp whole wheat flour
  • 2 tbsp grated coconut (you can use dried ones also, but fresh ones tastes good)
  • ½ tsp fennel seeds
  • 2 tbsp sugar (you can add more as per your taste, but as ripe bananas are naturally sweet, I didn’t add much)
  • 3 tbsp milk (I used 2 tbsp of milk cream)
  • A pinch of salt
  • A pinch of baking soda (optional)
  • A pinch of cardamom powder
  • Oil as needed for frying

Method

  • Mash the bananas well in a bowl with a fork
  • Add the rice and whole wheat flour and mix well, make sure that there is no lump
  • Add the milk or milk cream and mix well again
  • Add the coconut, fennel seeds, sugar, salt, baking soda, and cardamom powder
  • Give it a good mix and keep the mixture in fridge for 15 minutes
  • After 15 minutes, heat oil in a heavy bottom pain, keep the flame on medium
  • Drop the mixture with the help of a spoon and deep fry the fritters till they turn golden brown from all side
  • Take them out in a paper towel to soak excess oil

Serve hot with your favorite tea or coffee 😊

Follow my blog with Bloglovin

Thursday, November 19, 2020

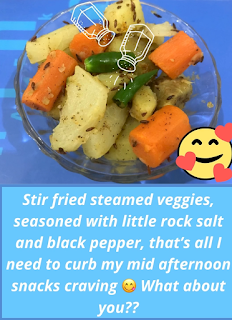
Craving for mid afternoon snacks??

What do you do when a strong craving strikes somewhere around mid-afternoon?? Think πŸ’­ about a piece of cake 🍰or doughnut 🍩 or a packet of chips or French fries 🍟?? irresistible right?

Hey! what about your healthy eating resolution??

Don't worry, good newz is that we can snack guilt free on something that's healthy and at the same time yummy as well πŸ˜‹

One of my favorite is stir fried steamed veggies.


Ingredients

  • 1 bowl of cubed veggies of your choice (I took carrot, sweet potato, and papaya)
  • 1 green chilli (optional)
  • 1 tbsp. cumin seed
  • 2 tbsp. ghee (I took my homemade one)
  • Rock salt to taste, you can take normal salt also
  • Black pepper powder
  • Garnish, 1 tbsp. cilantro chopped (optional)


Method

  • Steam the cubed veggies in such a way that they are still crunchy.
  • Heat 2 tbsp. ghee in a wok, add cumin seeds and allow them to crackle.
  • Add the sliced green chili and sautΓ© it.
  • Add all the steamed vegetables and sautΓ© a little.
  • Add rock salt and black pepper.

Your yummy and healthy mid-afternoon snack is ready to munch on 😊

My other healthy munching options are;

  • Raw or steamed veggies with hummus
  • Handful of dry fruits
  • Yogurt with fruits
  • Baked banana chips
  • Any kind milkshake with fruits, banana milkshake is the easiest one 😝😝

Let me know which one is your favorite??


Follow my blog with Bloglovin

Sunday, November 8, 2020

Millet Khichdi - Quick and tasty one-pot meal

In India, traditionally even 30 years ago, people always ate a broad spectrum of pulses, grains, legumes, and cereals on a daily basis, we have been using millets in our regular diet for centuries, but these are getting lost in today’s fast-paced life.

Recently, more people have started including millets in their diet. It is a known fact that millets are extremely healthy and are a powerhouse of nutrients.

One cup of cooked millet contains about 207 calories with over 6 grams of protein, 2 grams of dietary fiber, and less than 2 grams of fat.

High fiber levels found in millet may help reduce low-density lipoprotein (LDL) or “bad” cholesterol while boosting high-density lipoprotein (HDL) or “good” cholesterol.

Millets are rich in protein which strengthens hair follicles and prevents them from breaking easily. It is recommended for people who experience hair loss.

This millet khichdi recipe combines millets with lentil and veggies.


Ingredients

  • 1 cup foxtail millet
  • 1 cup moong dal
  • 1 tbsp. ginger paste
  • 2 tbsp. ghee
  • 1 cup chopped vegetables (carrot, peas, cauliflower, potato) as per your wish.
  • 2-3 green chilies sliced (optional)
  • 1 tsp. garam masala
  • ½ tsp. turmeric powder
  • ½ tsp. cumin powder
  • 1 tsp. cumin seeds
  • salt to taste
  • Garnish1 tbsp. cilantro chopped (optional)


Method

  • Soak millets overnight.
  • Heat 1 tbsp. ghee in a pressure cooker. Add cumin seeds and allow them to crackle.
  • Now add ginger paste, turmeric powder, cumin powder, and green chilies and cook for 2 minutes.
  • Now add all the chopped vegetables and saute a little.
  • Add the soaked millets and moong dal.
  • Add about 3 cups of water, garam masala powder, and salt.
  • Cook for 2 whistles.
  • Open the cooker. Sprinkle 1 tbsp. ghee and coriander leaves for garnishing.
Your yummy and healthy millet khichdi is ready to be served with a dollop of homemade ghee.

Follow my blog with Bloglovin

Chocolate mug cake – a quick fix for that unbearable chocolate craving

 Yesterday, Baby S went for a birthday party in our apartment, and within a few minutes, I received a couple of pictures in the WhatsApp group. The birthday boy was blowing off a candle and cutting a delicious looking chocolate cake; and all the kids (difficult to identify who is who, as all of them were wearing masks πŸ˜ŠπŸ˜Š) are standing around the table and cheering for him.

Looking at the birthday cake picture, I started getting a chocolate craving, but this time I had my quick fix ready; I remembered the first the time I prepared mug cake πŸ˜Š

It was almost three years back; was supposed to be a lazy Sunday, but alas!! it started with a recurrence of Baby S’s fever and as usual Daddy S started panicking, putting all the blame on me, why didn’t I take her to see the doctor in the first place? Why did I send her to school after two days of fever remission blah blah blah πŸ˜’

I, though irritated at his comments, started looking for doctor appointments, and to my dismay, I found only a couple of doctors are available…doctors should take special appointments on Sundays……anyway, after not much thought, I reluctantly booked an appointment with the pediatrician who did ear piercing for Baby S. 

Baby S started crying as soon as she heard that we are going take her to the doctor which irritated Daddy S more and war broke out between them...oh god, give me a break.

However, the visit to the doctor was peaceful, so the afternoon actually turned out to be a lazy one.

Then it was time for our Sunday special evening snacks…ready to eat smiley, chicken nuggets with tomato ketchup & mayo and some fryums…and we were done…really???? Nooooo!! I wanted something else, I was craving for some chocolates…we had one coco filled cupcake left (MIL bought two) and both Baby S and Daddy S wanted to have it…what about me!!!!… I didn’t have a chocolate craving during my pregnancy, but that doesn’t mean I can’t have one now.

I wanted chocolate cake within 5 minutes, I simply didn’t want to wait and didn’t want to go out…final outcome was yummy moist warm chocolate cake with chocolate sauce topping…and as by the time Baby S had already finished her cupcake, she wanted to share my mug cake also…and her the comment was, “Mamma, it’s so yummy, I like it” πŸ˜‹


So, here is the recipe for a warm moist chocolate mug cake…put together in a jiffy within 5 minutes for your unbearable chocolate cravings

Ingredients:

  • ¼ th cup all-purpose flour
  • 2 tbsp cocoa powder
  • ¼ th tsp baking powder
  • 3 tbsp granulated sugar (you can add or reduce as per your taste, I like it more sweet)
  • ¼ th cup milk
  • 2 tbsp vegetable oil
  • 1 tbsp Nutella (optional, you can use any sweet spread or jam of your choice)
  • 1 tbsp choco chips (optional)
  • 1 tbsp of chocolate sauce (optional)

Method:

  • Take a microwave-safe bowl or mug (take big enough mugs so that the cake can rise, mix all the dry ingredients together
  • Whisk the milk and vegetable oil
  • Add the spoonful of Nutella or jam of your choice on top, no need to push it down
  • You can add a spoonful of choco chips or broken cashew also on top
  • Microwave for 70 to 90 seconds depending on the type of your microwave.
  • Carefully remove from microwave and enjoy.

What do you do for you unbearable chocolate cravings, especially as you can’t go out so often due to this Corona pandemic??

Follow my blog with Bloglovin

Onion-cucumber raita

Raita is an Indian dish made with yogurt, spice powders, herbs, veggies like onion, cucumber, and carrot.

It’s a simple, fifteen-minute recipe, and has so many variations, it can become spicy or plain, sweet or savory. It’s an integral part of regional thalis; side dish for pulao, biryani, kebabs, or stuffed parathas. Raita is generally made to tone down the heat of the spicy foods like biriyani or kebabs, as yogurt, cucumber, and mint have a cooling effect it balances out the spicy food and helps digestion.


I like to keep my raita thick and add lots of veggies so that you get them with every bite.

When it comes to the choice of vegetables and fruits, there's no end to the options, you can choose any seasonal favorite and use it in the raita.

In fruits, our favorite is pineapple, before adding the pineapple cubes to raita, just caramelize them a little bit with sugar.

This recipe is the easiest variety with finely chopped cucumber, onion, and coriander leaves.


Ingredients:

  • 2 cups thick plain curd/yogurt, straight out from the fridge, I like my raita chilled
  • 1 tbsp rock salt
  • 1 tsp roasted cumin seeds
  • 1 green chili, finely chopped (optional, you can increase or decrease as per your choice, I completely omitted it)
  • 1 small onion finely chopped
  • An equal amount of finely chopped cucumber
  • 1 small tomato, finely chopped (optional, in this preparation, I didn’t use)
  • 3 tbsp fresh coriander leaves, finely chopped


Method:

  • Take out the chilled curd and beat well
  • Wash and chop the veggies
  • Mix all the chopped veggies with beaten curd, add little water if you want to make the consistency a little thin, I like it thick so I didn’t add water
  • Add rock salt and roasted cumin seeds, mix well
  • You can sprinkle a little roasted cumin powder on top as well

Your favorite raita is ready to be served with pulao or veg tehri or biriyani πŸ˜ŠπŸ˜Š

Follow my blog with Bloglovin

Veg tehri – healthy and super easy one-pot rice meal

Tehri is a one-pot rice dish, you can say a variation of pulao that originated from Awadhi cuisine. This is very easy to prepare; you can add your choice of veggies or meat or chicken to it. I generally prepare it with lots of veggies because that way you can pack a lot of nutrition in your as well as your kid’s diet, especially if you have picky eaters at home πŸ˜Š.

I learned this dish when I was staying in a ladies’ hostel in Delhi; there one of my roomies was from Nainital and she prepared this dish whenever we had a mid-week holiday. In our hostel they only used to serve breakfast and dinner as most of the ladies will go out during the daytime. So, if we had a mid-week holiday either we had to order from outside or go out ourselves. We preferred to experiment with our culinary skills, and this was one of our most popular dishes πŸ˜Š.

This is one of Baby S’s favorite rice dish too, of course, after biriyani πŸ˜Š. Anytime I am about to prepare Tehri, she would say, “Mamma, please prepare some extra, I want to have it for tomorrow also.” Before the pandemic sometimes I have packed this for our lunch boxes also along with raita.


So, let's get started and prepare this super easy, one-pot meal.

Ingredients:

  • 1 cup basmati rice, you can use any rice
  • 2 cups of water
  • 2 tbsp oil or ghee/clarified butter
  • 1-inch cinnamon stick
  • 4 green cardamom pods
  • 1 black cardamom
  • 4 cloves
  • 1 tsp jeera/cumin
  • 1 green chili, slit lengthwise
  • 1 tsp ginger-garlic paste
  • ½ cup onion finely chopped
  • ¼ cup tomatoes, cubed
  • ½ cup of cubed veggies of your choice (I used potatoes, carrots, and beans)
  • 2 tbsp fresh coriander leaves, finely chopped; it gives a nice flavor, but unfortunately, I ran out of it, so I didn’t use it
  • 2 tsp raisins/kishmish (this is a must if I am serving it to Daddy S also πŸ˜Š, he loves raisins)
  • ¼ tsp turmeric powder
  • ½ tsp coriander powder
  • ¼ tsp roasted cumin powder
  • ¼ tsp chili powder, adjust as per your taste
  • ½ tsp garam masala powder
  • Salt as per taste


Method:

  • Wash the rice and let it soak for 30 minutes, after 30 mins, drain the water and keep aside
  • Heat oil in a cooker or a kadhai, I use a cooker, saves time and gas πŸ˜Š
  • Add cumin, cinnamon, cardamom, and cloves
  • Once the cumin starts spluttering, add the onions and the slit chili, fry till the onion becomes translucent
  • Add ginger-garlic paste and fry a little more
  • Add all the masalas, coriander, cumin, chili, garam masala, and salt, and add little water so that the masalas are mixed well, fry for 2 minutes
  • Add tomatoes and all the other vegetables, fry for 2 minutes on medium flame
  • Add the rice and mix it well with the vegetables, fry for another 2 minutes on medium flame
  • Add water, mix well and taste the salt, pressure cook for 1 whistle
  • Once the pressure goes off, gently fluff the rice and sprinkle the chopped coriander leaves

Veg Tehri is ready to be served with raita…enjoy πŸ˜ŠπŸ˜Š

Follow my blog with Bloglovin

Banana milkshake - healthy and yummy

 Last weekend after Ganesh Chaturthi was over, other than Ganesh’s blessings, we were left with dozens of bananasπŸ˜€. Some were already there from our weekly grocery shopping, and the rest came as prasad from Ganesh Chaturthi. 

Seeing the pile of bananas, my mother in law kept on reciting “why don’t we make some banana milkshake?“ I knew that “we” actually meant “you” πŸ˜’but I was not in a mood to make milkshake during a busy weekday.

Finally, I gave up! I was fasting on Friday and by the evening I needed something to boost my energy😰. Banana milkshake felt like the perfect choice at that time. Also, it is Baby S’s most loved drink.πŸ˜‹

Bananas and dates are powerhouses of energyπŸ’ͺ, a rich source of dietary fiber, potassium, calcium, vitamins, and various antioxidants, an instant energy booster.


So here comes my simple banana milkshake recipe, nutritious, healthy, and delicious.

Ingredients:

  • 2 ripe bananas, chopped, over-riped ones are best
  • ½ liter chilled milk
  • 2-4 deseeded and chopped dates
  • 1 tbsp crushed dry fruits, I used almonds, cashews, and pistachios
  • 1 tsp sugar (optional), I didn’t add sugar, bananas, and dates were naturally sweet

Method:

  • Add chopped bananas and dates along with the milk in a blender
  • Blend until smooth and frothy
  • Garnish with crushed dry fruits
  • Serve immediately

My other fasting foods are sabudana khichdi, sabudana kheer, sabudana vada, boiled, and sautΓ©ed veggies.

Follow my blog with Bloglovin

Rice kheer – Creamy and aromatic Indian rice pudding

Rice kheer (rice pudding) is an integral part of a Bengali birthday, it was Daddy S’s birthday, so I had to prepare kheer. He likes rice kheer very much with lots and lots of raisins in it; he likes raisins so much that if possible, he would put raisins in mutton biriyani also πŸ˜ŠπŸ˜Š.

Two days before Daddy S’s birthday, I had ordered 1 liter of full cream milk and 1 kg of Gobindho bhog rice from an online shop, but alas, in the morning they said Gobindo bhog rice was out of stock….oh God!!! What do I do now? With this Corona think going on, I just can’t step out of the house and get your stuff, but I had no option. Reluctantly, I put on all my protective gear and went to the nearest supermarket, no luck; then I went to another grocery shop, no luck there also . I started feeling nervous and started blaming myself, why didn’t I stock it up earlier; I almost felt like crying in the middle of the road 😨. Suddenly, the shopkeeper of the grocery store told me to check one of the nearby chicken shops, the owner of that shop is a Bengali, they might stock this kind of rice…ohh, what a relief. I almost ran to that shop, I needed that rice before this shop also runs out of stock, and thank God, they had a couple of packets in store. My day was saved. Along with the rice, I bought some chicken drumsticks also for preparing evening snacks, as eating out was not an option we needed something spicy in the evening for @home celebration πŸ˜ŠπŸ˜Š.

I started the birthday preparation from the evening before Daddy S’s birthday; marinated the chicken and kept in the fridge for preparing chicken drumsticks next day and then I started preparing the kheer.


You can prepare kheer for any special occasion or even when you just want something sweet.

Ingredients for preparing kheer:

  • 1-liter full cream milk
  • ½ cup of rice, I prefer Gobindo bhog rice because of its aroma, you can use any kind of aromatic rice
  • 4 green cardamoms, slit open or slightly crushed
  • 1 cup of sugar or jaggery, Daddy S likes his kheer real sweet
  • 2 tbsp raisins, soaked in water
  • 2 tbsp chopped cashews, I soak the cashews and make a paste out of it to make the kheer more creamy

Method:

  • Wash the rice under running water till water turns clear and keep it soaked for 30 mins
  • After 30 mins, drain the water and keep the rice aside
  • Heat a heavy bottom pan, I used a non-stick kadhai
  • Add the milk and keep stirring so that it doesn’t stick to the bottom (even in non-stick it gets stuck), keep the flame at medium to high
  • Once the milk starts boiling, lower the heat add the rice and keep stirring
  • Add the crushed cardamom pods at this time
  • Keep cooking till the milk reduces to half and the rice is cooked very well
  • Add in the cashew paste and stir it well
  • Add the sugar or jaggery and mix well, cook for another 5 minutes
  • Squeeze the water out from the raisins add it in the kheer and switch off the gas. I add the raisins at the end because sometimes due to the sourness of the raising the milk might curdle and all your effort will go down the drain 

Now let your kheer cool down, and as it cools it will continue to thicken and give that creamy texture to the kheer.

We like our kheer chilled but it's up to you, you can serve it hot also. You can garnish it with more chopped dry fruits, add a splash of rose water to add more flavor to it πŸ˜Š

Follow my blog with Bloglovin

Air fried Chicken drumsticks – yummy as well as healthy

It was Daddy S’s birthday and obviously, due to this pandemic situation, we couldn’t go out for the celebration. Also, it was a weekday, so the day simply started with me and Baby S wishing him on his special day πŸ˜Š.

In the evening, Daddy S started missing the celebration πŸ˜”, he wanted something special, something yummy, and I knew it was coming. I kept my arrangements ready and quickly made chicken drumsticks for him πŸ˜Š.

Homemade healthy and tasty air-fried chicken drumsticks, Daddy S’ favorite snack. Actually, we all love it, and when it is homemade and healthy you don’t have to feel guilty and you can eat as much as you want πŸ˜ŠπŸ˜Š.

 Baby S gifted him a cute hand-made card. She drew a scenery that she just learned in her drawing class. 

Drawing is one activity, other than watching cartoons or videos of course πŸ˜‰, that she enjoys very much; and when it comes to giving a surprise gift to Daddy S, she is always ready. She had spent the entire evening, the day before, preparing this card for him; while I was preparing kheer, a must for any Bengali birthday.

Finally, Daddy S's birthday was spent well😍

Here is the recipe for my simple chicken drumsticks

Ingredients:

  • 8 chicken drumsticks
  • 1 tbsp of vinegar
  • 3 tbsp of ginger-garlic paste
  • ¼ tsp of soy sauce (optional)
  • 1 tbsp of mustard oil
  • Salt as per your taste
  • ¼ tsp of black pepper powder
  • 2 tbsp of chicken tikka masala
  • Juice of a half lemon
  • 1 tbsp chaat masala

Method:

  • Wash the chicken drumsticks very well and drain out the water completely, make 2 slices on the side so that the masala can go inside
  • Marinate in vinegar for 30 mins
  • After 30 minutes, take out the drumsticks and put them in another bowl
  • Add ginger-garlic paste, soy sauce, mustard oil, chicken tikka masala, black pepper powder, and salt with the drumsticks and mix well
  • Keep it in the refrigerator overnight, or a minimum of 2 hours
  • Once marinated well, mix them well again.
  • Pre-heat your Air-fryer for 5 minutes at 200-degree centigrade, and grease the air-fryer basket
  • Place the drumsticks in the air-fryer basket and fry for 12 minutes, no need to add extra oil, the chicken will cook in its own juice
  • Take out the basket, flip the drumsticks and fry for another 12 minutes

Yummy drumsticks are ready πŸ˜‹, take them out carefully, squeeze the juice of a half lemon and pour on top of the drumsticks, sprinkle some chaat masala, and serve hot with salad.

If you don’t have an air fryer, don’t worry, you can make them on a non-stick pan on a stovetop, just lightly grease the pan and place the drumsticks, once brown from one side, flip it and fry from the other side till done. You can do it in the microwave also, just bake them on a baking tray.

Follow my blog with Bloglovin
Sabudana Vada – Air fried healthy cousin of the deep-fried version

 Sabudana vada, a very popular Maharastrian dish, is one of our favorite snacks.

They are instant energy boosters, high in carbs and glucose; made with tapioca pearls (sabudana), mashed potatoes, roasted peanuts, and herbs; crispy from outside and soft, light, and chewy from inside. Also, as it is mostly prepared during fasting, the recipe does not contain onions, garlic, wheat products, lentils, or pulses.

I first tasted it in Delhi when one of my colleagues brought it for lunch during Navaratri fasting. As it is, she was fasting, so I finished half of her lunch box πŸ˜ŠπŸ˜Š, it was really yummy. The next time, I tasted it in a very popular Maharastrian restaurant in Bangalore when we went out for an office lunch, I couldn’t resist myself from taking the second serving.πŸ˜‹

You can understand how much I liked it, so it was high time that I learn the recipe and prepare it myself. The only thing that was bothering me was the deep-frying part, traditionally it is made by deep-frying . So, I had to give the recipe a twist, I tried Air frying them and the result was absolutely delicious, a healthy version without compromising the taste πŸ˜ŠπŸ˜Š, and the brownie point was both my picky eaters, Daddy S and Baby S liked it.

I have also tried preparing them in appe pan and baking them in microwaves, the results were more or less the same every time.

You can serve them hot with some green chutney or sauce as a teatime snack also.

How to prepare Sabudana Vada

Ingredients:

  • 1 cup sabudana or tapioca pearls, medium-sized, soaked overnight or for a minimum of 5 hours
  • 2 medium-sized potatoes, boiled and mashed
  • ½ cup peanuts, roasted, deskinned, and crushed
  • ½ tsp ginger paste
  • ½ tsp jeera or cumin seeds
  • 1 green chili, finely chopped, you can adjust the amount as per your taste
  • 4 tbsp freshly chopped coriander leaves
  • ½ tsp rock salt or sendha namak if preparing during fasting
  • 1 tsp chat masala (optional)
  • 1 tbsp lemon juice
  • Oil as needed for deep frying, (I used only for greasing the Air fryer basket or appe pan and my hands while preparing the patties)

Method:

  • In a large bowl take the sabudana, wash them once under running water, then soak in enough water. I generally wrap them in a kitchen towel, soak them and leave overnight
  • The next day, Sabudana will soak all the water, swell up and become soft
  • If there is excess water drain them out completely and keep the sabudana aside
  • Wash the potatoes very well and boil them with skin, make sure not to make them mushy
  • Once boiled, let them cool down, then peel off the skin and mash them. Keep them aside
  • Heat a kadhai and dry roast the peanuts till the skin peels off
  • Remove the skin and coarsely grind them
  • Now put all the ingredients except oil, in a large container and mix them well, you can grease your hands with a little oil as the starch from sabudana starts getting sticky
  • I added a little bit of chat masala also, you can skip this if you are preparing for fasting
  • Mixing well helps to bind the sabudana vada well and prevents breaking. You can use little rice flour or cornflour also for binding if you are not fasting. If you are fasting, you can use kuttu ka atta (buckwheat flour)
  • Prepare medium sized balls from the mixture and flatten them between your palms to give the desired shape to the vadas
  • Preheat the Air Fryer for 5 minutes at 160 degrees, then put the vadas in the Air Fryer basket and fry for 10 minutes, once done, flip and cook from the other side as well for another 10 minutes
  • If you are preparing in appe pan, grease the grooves of the appe pan lightly with oil and place the vadas and fry till golden brown from one side, once done flip and cook from the other side as well

Sabudana Vadas are now ready to be served hot with green chutney or curd or sauce!!!πŸ˜‹

If you don't have an Air fryer, don't worry, you can still prepare these healthy and yummy snacks, simply grease a non-stick frying pan and shallow fry the sabudana vadas. Just make the vadas a little thin so that it can cook nicely from inside. 

My other favorite fasting recipes are Sabudana Khichdi and Sabudana kheer, boiled veggies with a pinch of rock salt, sauteed cubed paneer with a pinch of rock salt, and the best is a banana milkshake, the easiest one πŸ˜€

Follow my blog with Bloglovin

Rice appe or paniyaram - perfect healthy breakfast or snack

Appe is a typical South Indian breakfast recipe which also goes by the name of paddu, guliappa, gulittu, yeriyappa, gundponglu, ponganalu in different parts of South India.

I first tasted it after coming to Bangalore while sharing lunch with one of my colleagues, and instantly fell in love with it.

So, I had to learn the recipe and prepare it myself and to my surprise, my experiment was successful 😊😊, my whole family loved it; especially Baby S, she was so excited when she saw me preparing this, she was already aware of this dish, thanks to her school, this was one of the most popular breakfasts that were served in her school. Apparently, Daddy S also had tasted it in his office and liked it…wow!!!


Appes are shallow fried dumplings prepared in a special appe pan or mold which typically has 7, 9, or 12 shell-shaped grooves.


These are perfect healthy breakfast or snack choices with minimal usage of oil and also perfect for go-to breakfast during morning’s rush hours. Typically, it's prepared with leftover idli or dosa batter. You can add veggies of your choice like capsicum, peas, beans, carrots, etc. to pack more nutrition into it or hide the vegetables in it for your picky eaters 😊😊; it tastes great when served hot with a choice of chutney or even sambar. You can also pack it for lunch box.

Here comes the recipe for a quick and healthy breakfast;

Ingredients:

  • 1 cup idli rice
  • ¼th cup urad dal
  • 5-6 curry leaves
  • 1 tsp cumin seeds
  • 1 green chili (finely chopped)
  • 1 tsp mustard seeds
  • ¼th tsp asafoetida or hing
  • 2 tbsp finely chopped onions
  • ½ cup finely chopped vegetables of your choice
  • Oil for greasing the appe pan
  • Salt as per taste

Method:

  • Wash and clean rice and urad dal, soak them separately in water for 5 hours.
  • After 5 hours, drain excess water and grind them together in a grinder jar to a fine paste, use water as required to make a thick-consistency batter
  • Allow the batter to ferment overnight or for at least 8 hours
  • Heat a kadhai or tadka pan and put 1 tbsp oil. Add mustard seeds, cumin seeds, hing, green chilies, and curry leaves. Fry for a couple of mins
  • Pour this tadka on the batter, add salt and mix well
  • Appe Batter is now ready, consistency should be like a spoon drop
  • Heat the non-stick appe Pan.
  • Grease the molds with some oil.
  • Pour a spoonful of batter in each mold, cover, and cook on medium heat
  • Once the appes are cooked from the bottom, flip over and cook from the other side

Your quick go-to morning breakfast is ready to serve with chutney, sambhar, or sauce.

Follow my blog with Bloglovin

Alu bhate, the Bengali style mashed potato

Since this whole lockdown thing started in the wake of the COVID-19 pandemic and cooks & maids stopped coming; Alu bhate has become my favorite side dish πŸ˜ŠπŸ˜Š. Me, as well as my whole family, realized how much we love alu bhate 😘…warm rice with ghee, masoor dal, and alu bhate… quick, easy, tasty, and healthy lunch.

In the pre-pandemic era, it was Baby S and my favorite breakfast before rushing out for school and office respectively πŸ˜Š. I used to pressure cook everything together; Gobindo bhog rice, moong dal, grated potato, chopped onion, and salt and then serve hot with a dollop of ghee on top. It used to keep us full until our lunchtime. Daddy S also never said no to this healthy and tasty breakfast πŸ˜‹.

Actually, to be very honest, it has always been our quintessential comfort food. After coming back from a vacation, we would always long for dal, alu bhate, bhat (Lentil soup, mashed potato, and rice) to give our stomach a break. While recovering from illness, we will have plain rice and mashed potato as it is easy to digest and tastes good.

Alu bhate simply means potatoes boiled with rice. Once the rice is fully cooked, potatoes were taken out and the extra water with starch is drained out from the rice. The boiled potatoes were then mashed and mixed with salt, little mustard oil, green chili, and fresh coriander leaves… and that is it, our side dish is ready. Also, if you have some leftover, you can use it for making Alu Parathas or sandwich πŸ˜ŠπŸ˜Š

Alu bhate, Bengali style mashed potato


Here is a simple recipe for classic Bengali comfort food, alu bhate or alu makha.

Ingredients:

  • 2 medium-sized potatoes
  • 1 tbsp mustard oil, you can use ghee also instead of mustard oil
  • 4 tbsp chopped onion
  • 2 tbsp freshly chopped cilantro
  • 1 tsp finely chopped green chili (optional, you can add more as per your taste or completely omit it)
  • Salt as per taste
  • 1 tsp lemon juice (optional)

Method:

  • Wash the potatoes very well to remove all the dirt from the skin
  • Boil the potatoes with the skin on, you can either boil it with rice or you can pressure cook it till tender
  • Let them cool down completely before peeling off the skin
  • Mash them well
  • Add all the other ingredients together and mash well again.
  • Serve with warm rice topped with ghee or butter

This is perfect for bachelors also, easy to cook and goes well with plain rice and ghee πŸ˜ƒ.

Please visit my post if you want to know how to make ghee at home, step by step process.

Follow my blog with Bloglovin

Homemade Ghee or clarified butter

Ghee is a traditional Indian superfood and has been enjoyed for thousands of years. It’s also frequently used in Ayurveda and other healing medicines. It is an amazing powerhouse πŸ’ͺ.

Mostly in all Indian households, milk is consumed in some shape or form and a typical by-product after boiling the milk is cream.

We are no different, but in my family, no one prefers to have the cream along with milk, so I collect the cream for a few weeks in a glass container and store it in the refrigerator and then churn the cream and boil it on low to medium flame to make ghee.

Yes 😊, it's that simple!!

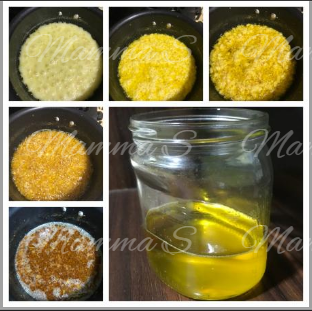
Step by Step process to make ghee;

Ghee making, step  by step


Ingredients
:

1-liter heavy cream/malai/cream of milk (straight from the refrigerator)

Method:

  • Take out the cream from the refrigerator.
  • Put it straight into a large kadhai or wok and switch on the gas
  • With the help of a ladle, stir continuously so that there is no lump and then let it simmer
  • As the butter simmers, it will start foaming and spluttering
  • Continue cooking on low to medium heat for 30 minutes, stirring occasionally to make sure the milk solids don't burn at the bottom
  • It will gradually start changing color from a bright yellow to slightly brownish and then to a light golden brown
  • Gradually it stops foaming, ghee becomes clear and separates from the milk solids at the bottom, milk solids turn brown; make sure they don’t burn
  • Let it cool for a few minutes and strain the ghee with a steel strainer or cheesecloth.

Your ghee is ready! Store it in an airtight jar.

You can use brown milk solids in different kinds of gravy to make it thick and flavorful or make sweets. I made milk-cake out of it, me and Baby S loved it πŸ˜‹.

Ghee has a very long shelf-life, it can be stored at room temperature for three to four months. In the refrigerator, it can be stored up to a year.

You can use ghee for tempering dal or curries or you can top idli, dosa, rice, parathas, rotis, etc. with ghee to add more flavor to them. It is also believed to aid digestion if used in moderate quantity.

Baby S and I love warm rice with ghee, a little salt, and mashed potato πŸ˜‹.

Plain rice with homemade ghee


Mashed potato or Bengali Alu bhate 

Ghee is also very nutrient-rich and contains vitamins A, K2, and butyric acid.

It is also a fantastic homemade moisturizer. Just rub a little bit between your palms and apply it to your skin. Applying it regularly will make your skin soft and radiant.

Now that you know how to make ghee easily at home, why don’t you give it a try? 😊

Follow my blog with Bloglovin